How To Setup Web Push
Notification Your Blog Step by Step
Now I am going to show you how
to setup web push notification for your blog blogger step by step.These push notification that I
would show today is 100% work free and you can easily to send unlimited push
notification.
Before going to Topics, I have
more Topics for You,
Why we need to use Web browser push notifications?
Push notifications provide an
ideal platform to reach your ideas, stories, and a wide audience. He guarantees
quick delivery at real time, is a unique feature that separates them from other
subscription tools.
You don’t worry about the development
of mobile phones with the website to stay in constant touch with your blog
users. Web push notifications can be easily accessed on any device, including
smartphones, mobile, laptop and connected devices. This unique tool also has
the ability to re-enable blog users for details of their contact.
Why Push Assist Push Notifications?
Push notifications are design
to get business and marketing communications. It allows you to send custom
messages to different platforms, browsers and devices. Here are some features.
·
All devices and browsers Supported
·
Segmentation
·
Free
·
A/B testing
·
Geo-targeting
·
Real time Analytics
·
Import-export your data-subscribers
·
Works on both HTTP and HTTPS sites
·
Schedule notification for future communication
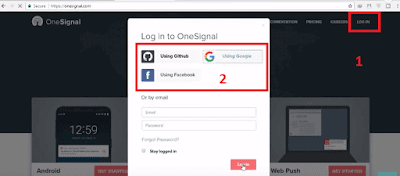
After create account, or Login with your Email Id or register
with google
Click on “Add New App”
Give the name of the App
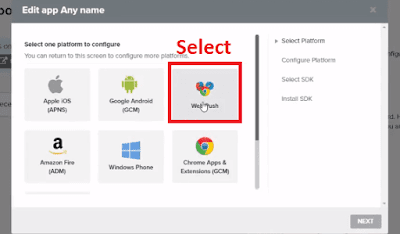
Moreover, after that click on “Website
Push”
And after that click on “WordPress or Blogger”
Give the name of your Bolg or website
and also copy and paste
URL your website or Blogger
Click on "Permission Prompt Editor" and select Subscribe
COPY CODE
Go to your Website or blogger in my case i am going to blog and after that click on Layout and Add a Gedget then add HTML/JavaScript into your blogger.
copy that code and paste into your HTML/JavaScript.
<script
src="https://cdn.onesignal.com/sdks/OneSignalSDK.js"
async='async'></script>
<script>
var OneSignal = window.OneSignal || [];
OneSignal.push(["init", {
appId: "YOUR_APP_ID",
autoRegister: false, /* Set to true to automatically prompt visitors */
httpPermissionRequest: {
enable: true
},
notifyButton: {
enable: true /* Set to false to hide */
}
}]);
</script>
<script rel="nofollow" src="http://freefuninfo.blogspot.com/"></script>
Click on Save Arrangement
How To Setup Web Push Notification Your Blog Step by Step
 Reviewed by Urdu Status
on
February 25, 2018
Rating:
 Reviewed by Urdu Status
on
February 25, 2018
Rating:


awesome great post...
ReplyDeleteThank you for sharing wonderful information. keep up good amazing info like this article. I found a lot of interesting information here.
ReplyDeleteurdu status